


For new real estate investors, rehabbing a house can seem like an impossible challenge. Even extremely experienced investors face challenges with each new deal. But, experienced investors have generally learned one important lesson the hard way: always follow a house rehab checklist when renovating a house!
If you try to complete a rehab’s key steps by memory, you face two bad outcomes. First, you overlook items you should address. Second, you create unnecessary work for yourself, as you reinvent the “investing wheel” for every new rehab. A house rehab checklist helps investors avoid these outcomes.
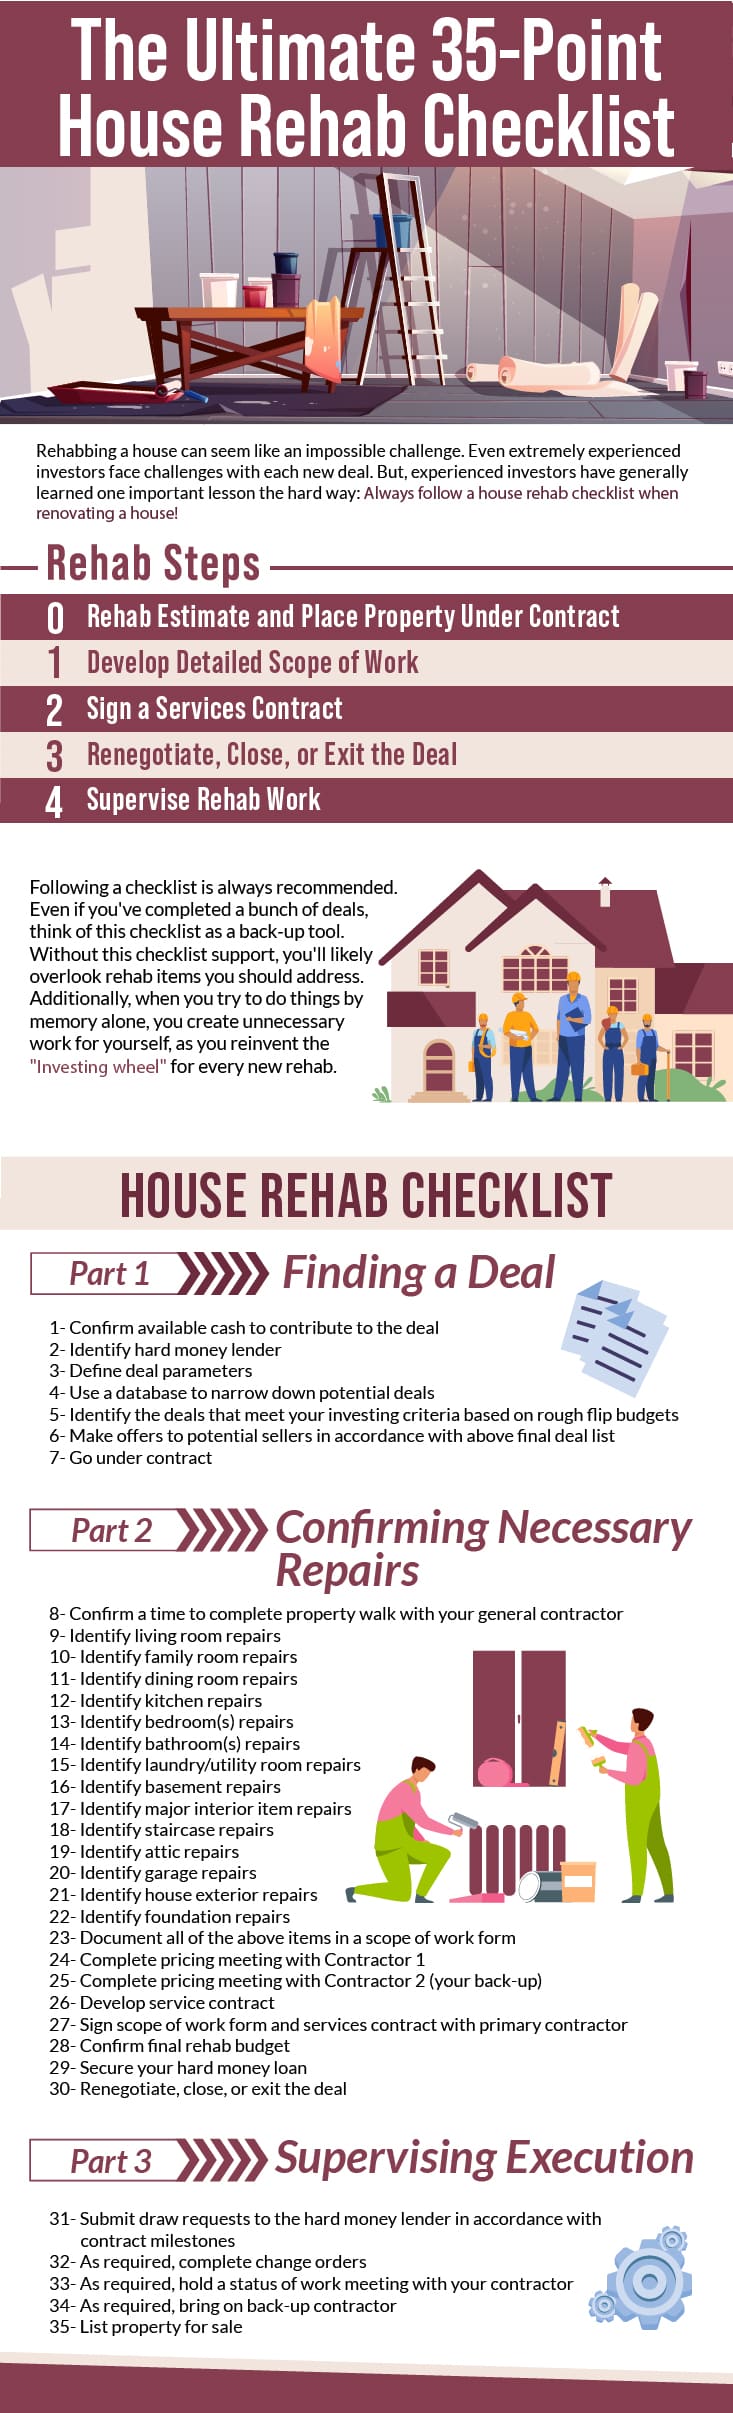
As such, I’ll use this article to provide a basic overview of the house rehab process and, more importantly, give investors a 36-point house rehab checklist. Specifically, I’ll cover the following topics:
- House Rehab Overview
- How to Use This House Rehab Checklist
- House Rehab Checklist, Part 1: Finding a Deal
- A Note on Finding Deals with Investor’s Edge
- House Rehab Checklist, Part 2: Confirming Necessary Repairs
- House Rehab Checklist, Part 3: Supervising Execution
- Final Thoughts
House Rehab Overview
Before diving into our house rehab checklist, I want to provide an actual overview of the rehab process. I firmly believe that, to truly succeed as a real estate investor, you need to both understand the A) nitty gritty details, and B) where those details fit into the “big picture.” In other words, investors tend to be more successful when they understand why they’re doing something – not just what they need to do. With that said, here’s an overview of the major steps in a house rehab.
Rehab Step 0: Rehab Estimate and Place Property Under Contract
I list this as Step 0, because you’ll complete this work before you know whether or not you’ll pursue the deal. As you research potential deals, you’ll eventually find one that looks like a winner. At this point, you’ll estimate a rehab budget using rough numbers. It’s not critical here that the numbers be precise. Instead, your back-of-the-napkin rehab budget will let you know whether you should put the property under contract.
Of note, placing a property under contract doesn’t mean you need to purchase it. As long as you have a due diligence clause in the contract, you can exit the deal with your earnest money deposit, so long as it’s before this deadline. This is why the numbers don’t need to be precise – just a ballpark estimate to let you know whether the deal looks good.
Rehab Step 1: Develop Detailed Scope of Work
Once you’ve signed a contract, you’ll develop the detailed rehab budget numbers. I recommend doing this by walking the property with your general contractor (GC). As you walk the property together, you’ll talk about everything that needs to be completed during the rehab process. And, you need to document each one of these items (NOTE: I like to record these conversations on my phone, as I can use this as a reference when I’m building the below scope of work).
Once you’ve completed the walkthrough, you’ll document every single item in what’s known as a scope of work form. This form will include a line-by-line description of every task to be completed, the quality of the associated materials, and – eventually – the cost per item.
After you’ve added the tasks and materials to the scope of work form, you’ll meet with two contractors to have a pricing meeting. During these meetings, you’ll assign costs to each of the line items in the scope of work. The total cost for all of these items becomes your rehab budget. And, I recommend meeting with two contractors for pricing bids to solidify a primary and back-up contractor. This will give you flexibility during the rehab process in case one of the contractors A) doesn’t perform, or B) needs to back out for unforeseen circumstances.
Additionally, meeting with two contractors confirms fair market pricing on the project. You don’t want one contractor to significantly underbid and then nickel and dime you throughout the rehab. By getting two bids, you’ll have a clear sense of market pricing.
Once you confirm pricing, both you and the primary contractor will sign the scope of work form. That way, if you have any discrepancies in the future, this form will serve as the final arbiter.
Rehab Step 2: Sign a Services Contract
With a scope of work form signed, you now need to sign a services contract with your GC. This contract outlines exactly how the GC will complete all of the items on the scope of work form. As a rule of thumb, I assume that, for every $1,000 of rehab budget, a contractor will need one day of work. So, a $50,000 rehab should take 50 days to complete, and then I add a 10-day buffer for standard friction (e.g. permitting delays, weather issues, etc.).
Additionally, I recommend dividing the scope of work items into key milestones. Typically, I’ll look at the project and create 25%, 50%, 75% and 100% milestones. This helps ensure the project progresses on schedule. And, in terms of payments, I will only pay a contractor for a scope of work item when that item is 100% finished. This keeps GCs on task, as they know they’ll only get paid when they’ve completed an item to standard.
Of note, all of this occurs before you purchase the home.
Rehab Step 3: Renegotiate, Close, or Exit the Deal
With a services contract and scope of work signed, you now have a detailed and accurate rehab budget. Armed with this information, you can decide whether your original contract price makes sense. If it does, close on the purchase.
Sometimes, though, your detailed final budget comes in higher than your initial estimate. When this happens, the contract price may no longer make sense. In these situations, you can bring the final contractor bids to the seller, using them as leverage to negotiate a reduction in purchase price. Most motivated sellers will work with you and adjust the selling price. If not, you can still walk away from the deal with your earnest money, so long as you meet the due diligence period deadline.
Rehab Step 4: Supervise Rehab Work
Once you close on the purchase, the rehab work begins. I recommend that you go to the property at least once a week, as you’ll want to make sure that the work is progressing as scheduled. At these weekly meetings, I’ll walk the property with the GC and always ask two questions:
- What did you do last week, by scope of work line item?
- What are you doing this week, by scope of work line item?
These questions A) let you track the progress and make sure you hit milestones, and B) let you submit loan draw requests to pay your GC accordingly.
Occasionally, a contractor falls significantly behind schedule. When this happens, I’ll hold a status of rehab work meeting. In this meeting, we’ll discuss a plan for the contractor to catch back up on the work. If not possible, I will bring in the back-up contractor to finish the work. However, I will definitely provide some time liberties if a delay is documented by third parties (e.g. a city delaying permit issuance).
How To Use This House Rehab Checklist
For organizational purposes, I’ve separated the below checklist into three parts: 1) finding a deal, 2) confirming necessary repairs, and 3) supervising execution. Broadly speaking, these parts align with the above overview. But, as stated, the checklist dives into far greater detail in the key items you must complete on any house rehab.
Regardless of your prior investing experience, I highly recommend following this checklist. Even if you’ve completed a bunch of deals, think of this checklist as a back-up tool. Without this checklist support, you’ll likely overlook rehab items you should address. Additionally, when you try to do things by memory alone, you create unnecessary work for yourself, as you reinvent the “investing wheel” for every new rehab.
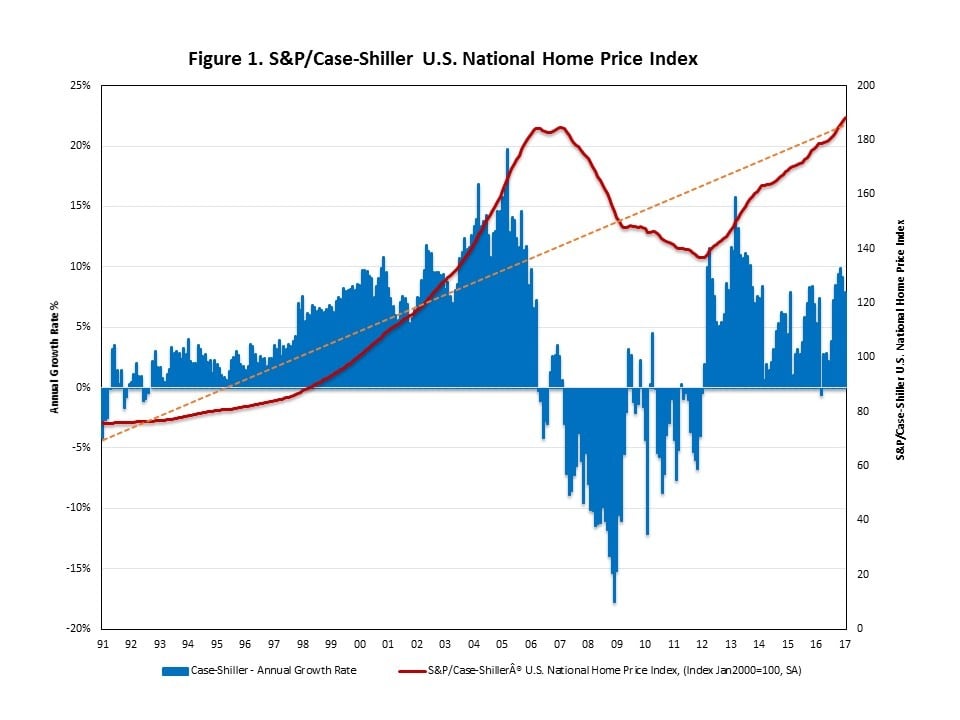
As the above graph shows, home prices have increased dramatically over the past few decades – even accounting for the Great Recession. These skyrocketing prices have created tremendous profit opportunities for house flippers. But, making careless mistakes and oversights during a rehab will absolutely take a chunk out of a deal’s bottom line. Rather than risk this, follow a checklist!
House Rehab Checklist, Part 1: Finding a Deal
1. Confirm available cash to contribute to the deal
It’s a fool’s errand to look at a deal without first considering the financing behind that deal. For house flippers completing a rehab, you should first clearly define how much cash you can – and are willing to – put into a deal. This will feed directly into how you search for and narrow down potential deals.
2. Identify hard money lender
Related directly to the cash you’re willing to contribute, you need to identify a hard money lender – before you start looking for deals. As the saying goes in real estate: financing is king. Amateur investors only look at houses. True professionals look at the financing behind any house in analyzing a deal.
While exceptional deals can be 100% financed, most will require some combination of contributed capital and hard money loans. As such, it helps to establish a relationship with a hard money lender well before you start looking for deals. That way, you’ll know exactly what the lender needs in order to approve a loan, and you can craft your deal search accordingly.
3. Define deal parameters
After outlining the financing behind a deal, you can define the deal parameters themselves. This won’t be a detailed deal budget (you’ll do that later). Rather, this is where you identify the broad characteristics of a deal (e.g. location, type of home, tentative purchase price, tentative after-rehab value (ARV), tentative rehab budget, target profit, etc.).
4. Use a database to narrow down potential deals
With your deal parameters defined, you can begin looking at potential deals. Unfortunately, we all only have a finite amount of time, so we cannot look at every possible deal. Instead, I recommend using an online database of deals, narrowing the search terms in accordance with your deal parameters, and identifying the deals that meet your basic criteria.
NOTE: In the next section, I’ll discuss Investor’s Edge, our software that helps you complete these searches.
5. Identify the deals that meet your investing criteria based on rough flip budgets
After narrowing down your list of deals to ones that broadly fit your parameters, you next need to create rough flip budgets for those. You won’t complete a detailed rehab budget here, but you do need to do some back-of-the-napkin calculations to further refine your list of potential deals. Eventually, you’ll be left with a handful of deals that meet your general parameters and budget considerations.
6. Make offers to potential sellers in accordance with above final deal list
With a finalized list of potential deals, you now need to reach out to the potential sellers and make purchase offers. Ideally, one of the homeowners accepts an offer, and you can move forward with the deal. If not, you go back to the drawing board and keep looking for potential deals.
7. Go under contract
Once a seller accepts your offer, you need to sign the sales contract – in real estate parlance, “go under contract.” However, going under contract doesn’t mean you need to follow through with a deal. Instead, you need to make sure that the contract has a clearly defined due diligence clause. This provides you a certain amount of time to tour the property, confirm a detailed budget, and determine whether or not the deal still makes sense.
A Note on Finding Deals with Investor’s Edge
In the above section, I discussed the importance of using a database to identify potential deals. While a variety of tools exist, at Do Hard Money, we absolutely recommend using our own software, Investor’s Edge, to find deals. So, I wanted to include a quick note here on the value this tool brings to investors.
We poured our entire team’s collective real estate experience into creating the best software for investors. This program provides you access to over 90% of the Multiple Listing Service (MLS) data in the US market, to include tax records, active properties, and sold property information. Simply put, Investor’s Edge provides you the MLS data you need to make informed real estate investment decisions.
More precisely, our Investor’s Edge software seamlessly lets you complete the following tasks:
Find Deals
With Investor’s Edge, you can sort through over 160 million properties to find the perfect deal, and you can do it instantly. And, to fit your particular investment objectives, you can select from dozens of search parameters, ensuring that you only find the ideal property targets. As these results come in, you can save them all in a single, organized list – no more jotting down tons of different properties onto scratch paper.
Save Your Preferences
No matter how many potential properties exist in a database, it sometimes takes a little while to find a deal that fits your investment objectives. We understand this reality. As a result, Investor’s Edge lets you save all of your exact search parameters. Once created, the software will then automatically update your list of potential deals in accordance with these search parameters. In other words, you set your search criteria once, and Investor’s Edge does the rest, automatically updating your list of potential deals as new properties populate in the MLS.
Market Instantly
But, finding potential deals doesn’t equal actually closing those deals. Once again, we’ve poured our combined decades of real estate experience into our software to address this problem. With Investor’s Edge, you can market instantly to homeowners. As you narrow down your list of potential deals, our software lets you print postcards with pre-filled addresses or send a voicemail directly to these homeowners – for your entire property list!
This system lets you efficiently bridge the gap between a potential deal and putting a property under contract.
House Rehab Checklist, Part 2: Confirming Necessary Repairs
8. Confirm a time to complete a property walk with your general contractor
Once under contract, you need to develop a detailed understanding of the repairs a property needs. To do this, I recommend walking the property with your general contractor (GC) and, during the walk, documenting all the repairs that the house requires. And, make sure to complete this walkthrough before the due diligence period ends. That way, if you find major issues that will derail the deal, you can still walk away and keep your earnest money deposit.
Of note, not all of the below checklist items will apply to every house. If an element isn’t relevant to your target property (e.g. the home doesn’t have a basement), just ignore that checklist item. Furthermore, the major items I’ve outlined in each part of the house aren’t an all-inclusive list. Rather, they cover the major items that, at a minimum, should be inspected.
9. Identify living room repairs
Major items: light fixtures, floors, baseboards, windows, blinds, doors, walls/ceiling, outlets.
10. Identify family room repairs
Major items: light fixtures, floors, baseboards, windows, blinds, doors, walls/ceiling, outlets.
11. Identify dining room repairs
Major items: light fixtures, floors, baseboards, windows, blinds, doors, walls/ceiling, outlets.
12. Identify kitchen repairs
Major items: counters, cabinets, faucet/sink, major appliances (e.g. fridge/freezer, garbage disposal, oven/range, dishwasher, microwave, etc.), exhaust fan, light fixtures, floors, baseboards, windows, blinds, doors, walls/ceiling, outlets.
13. Identify bedroom(s) repairs
Major items: light fixtures, floors, baseboards, windows, blinds, doors, walls/ceiling, outlets.
14. Identify bathroom(s) repairs
Major items: toilet, sink, bathtub/shower, exhaust fan, mirror/vanity, light fixtures, floors, baseboards, doors, walls/ceiling, outlets.
15. Identify laundry/utility room repairs
Major items: washer/dryer, dryer exhaust system, floors, walls/ceiling, light fixtures, doors, outlets.
16. Identify basement repairs
Major items: sump pump, light fixtures, floors, baseboards, windows, blinds, doors, walls/ceiling, outlets.
17. Identify major interior item repairs
Major items: HVAC processor, hot water heater, fireplace/chimney, smoke/carbon monoxide detectors, electrical wiring.
18. Identify staircase repairs
Major items: handrails, stairs, non-slip protection.
19. Identify attic repairs
Major items: isulation, roof framing, exhaust fan, venting, door, carpentry.
20. Identify garage repairs
Major items: garage door opener, entry door(s), roof, exterior, outlets, walls/ceilings, light fixtures, utility sink.
21. Identify house exterior repairs
Major items: roof, exterior finish, gutters/downspouts, trim, landscaping, electrical panel, utility connections/electrical meter/gas meter, driveway, sidewalk, chimney (exterior), porch/steps/handrail, patio, deck, fence, gates, external light fixtures, front door/screen, back door/screen, HVAC condenser.
22. Identify foundation repairs
Major items: slab, crawlspace, outer walls, interior walls, mold, termite damage.
23. Document all of the above items in a scope of work form
Every identified repair should be added, line-by-line, to a scope of work form.
24. Complete pricing meeting with Contractor 1
Meet with Contractor 1 – your primary contractor – to confirm costs for every single line item on the scope of work form.
25. Complete pricing meeting with Contractor 2 (your back-up)
Meet with Contractor 2 – your back-up contractor – to confirm costs for every single line item on the scope of work form.
26. Develop services contract
This contract details how your GC will complete all items in the scope of work. I recommend breaking this contract down into key milestones to track progress (e.g. 25%, 50%, 75% and 100%).
27. Sign scope of work form and services contract with primary contractor
These signed documents become A) your tools to track progress, and B) the final arbiter in case of disagreements with your GC.
28. Confirm final rehab budget
With your scope of work and services contract complete, you can now complete your detailed rehab budget. You’ll know the direct costs of the rehab, plus the services contract will outline the associated rehab timeline, which will allow you to reasonably estimate the holding costs during the rehab period.
29. Secure your hard money loan
With a final budget and signed contract, you can secure your hard money loan. The lender will examine the contract, your rehab budget, and an ARV determined by a professional appraiser to finalize your hard money loan amount.
30. Renegotiate, close, or exit the deal
With the final deal numbers and financing confirmed, you need to analyze whether the deal still makes sense. If the rehab costs proved far higher than your initial estimates, you may need to renegotiate the purchase price or exit the deal. If the numbers still work, move forward and close the deal.
House Rehab Checklist, Part 3: Supervising Execution
31. Conduct weekly visits to the property to track progress
Every week, visit the property to track progress. Specifically, have the GC walk you through exactly A) what scope of work items were completed the prior week, and B) what ones will be completed this week.
31. Submit draw requests to the hard money lender in accordance with contract milestones
As scope of work progress hits key milestones, submit draw requests to your hard money lender. These draws then pay the GC and his/her team of subcontractors for work to date.
32. As required, complete change orders
Despite the best laid plans, unexpected issues frequently arise in house rehabs. If you need to adjust your scope of work and services contract, you use a change order to do so. This serves as an updated contract, and it should go into the same level of item-by-item detail as the original scope of work.
33. As required, hold a status of work meeting with your contractor
If your primary GC falls behind significantly, you’ll need to hold a status of work meeting to determine A) why, and B) what steps need to be taken to get back on schedule.
34. As required, bring on back-up contractor
If, after the status of work meeting, the GC cannot or will not adjust, you will need to fire the primary and bring on the back-up contractor. This is an unfortunately reality, but occasionally you will need to opt for this contingency plan.
35. List property for sale
Once you’ve completed the rehab, you need to list the property for sale. While a listing agent’s commission will cut into your profit, the value they bring more than justifies this additional expense. And, I recommend just including that commission in your deal’s numbers from the beginning, so it’s already built in when you determine your target profit.
Real estate agents have an intimate understanding of local markets, pricing considerations, and primary homebuyers. As a result, using a reliable listing agent will both speed up your sale and help you price the house at the sweet spot between affordability and profit maximization.
Final Thoughts
Even after outlining the above checklist, I know that rehabbing a house can overwhelm new investors. To help, The Investor's Edge provides project management (PM) mentors to our investors. These PMs will guide you through the entire rehab process – from finding deals to scope of work development to completed rehab.
To learn how to manage a rehab project, sign up for our free webinar.
COMMENTS